I got home last night and sitting on my porch was a big blue box with my new heli in it. I brought it in unpacked it and started charging the battery. Unfortunately the kit only comes with a DC charger with alligator clips that you hook to a 12V car battery. So I hooked it up to my Jeep and started the battery charging while I took a look at my new toy. The pic to the left is what I found in the box. The controller seemed more substantial than I expected. The helicopter seemed a little more fragile than I would have hoped.
As the battery charged and I inspected the heli a little closer I discovered that, as I suspected, it

had been crashed. Even though the seller on e-bay described it as "out of balance" and claimed
he had only "hovered it twice". When I got the battery charged and spun it up a little the main shaft was obviously bent, the canopy had a small crack and one of the blades was broken.
None of this would have been a big deal since there were spare blades and a spare main shaft included. The blades came with the kit and apparently the seller had purchased a spare main shaft but had not installed it for some reason. So I set to swapping out the main shaft. This shouldn't have taken long except I had no idea what I was doing. After removing the fly bar, the blades and disassembling the swash I discovered that all I really needed to do was pull a pin and remove the whole head assembly as one piece.

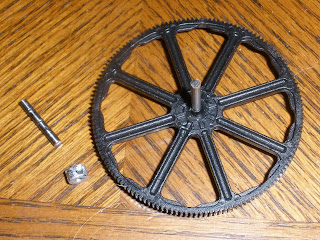
After getting the head off I discovered why the new main shaft hadn't been installed. The bolt in the retaining collar had been striped. After trying to get the bolt out with pliers with no success (these things are about a mm across) I decided to drill the bolt out and buy a new retaining collar. I drilled out the bolt and got the collar off. I ended up having to cut the shaft with a cut off wheel on my dremel to get the bearings off.
With everything disassembled and my "new" helicopter sitting in pieces on the coffee table I headed off to the hobby shop to get a new retaining collar. $44 later I had the $4 collar, an AC charger and a set of tools from e-flite made specifically for these models. I got everything back together, installed the symmetrical blades and once again spun it up. Most of the vibration was gone but the blades were a little out of track. After a little adjusting things were looking pretty good. So finally time to try to fly. At this point it was getting close to 9:00 so I didn't have much time before the wife would start complaining about the noise.
I set the heli in my kitchen on the tile floor and decided to start the RADD method. Battery one: spin up and spin down and hold the tail. OK. This sounds easy enough. Initially the controls seemed backwards. Left rudder made the tail go right, right rudder made the tail go left. Then I realized that I was "flying" the wrong end of the heli. Left rudder made the nose go left and right rudder made the nose go right. OK, it's going to take a while to get used to this, maybe this RADD guy is onto something.
Through the first battery I kept it on the ground. I managed to resist the urge to kick up the throttle and see what would happen. One of the rules of the RADD method is to keep the heli in a 1 ft square and any time it's gets out of the square you have to pick it up, put it back and start over again. When I would spin up the rotors the heli would start to drift to the left and forward so I ended up giving it some right aileron and down elevator to compensate and keep it in the box.
One thing I noticed at this point was the interaction between the controls. When I give it more left rudder I have to compensate with more right aileron to keep it from drifting left. Also I found that it's important to get the gyro initialized properly.
The gyro will attempt to hold the tail in one direction to compensate for the changes in torque when the main rotor speed changes. The main rotor spins in a clockwise direction which makes the heli want to spin in a counter clockwise direction when you add throttel and the reverse when you let off. When the battery is plugged in the gyro initializes for a few seconds. While this is happening it's critical to not move the heli. The first time I tried it I plugged in the battery and immediately moved the heli from the counter to the floor. It was almost impossible to hold the tail through spin up and spin down. Then I remembered reading about gyro initialization. I unplugged the battery and plugged it in again being careful to not move the model.
I started it up again and found that the gyro really did a good job of holding the tail. I only needed to give minimal rudder input to keep it in line. As the battery charge ran down I found that the tail had a tendency to drift to the left requiring more left rudder (remember left rudder makes the tail go right and the nose go left).
I tried to get my wife to take some videos but she wasn't being cooperative and it wasn't really very interesting to watch anyhow. Tomorrow I'll continue and hopefully she will be more accommodating. Stay tuned.
No comments:
Post a Comment